11.27.2012

All is Calm, All is Bright

I saw this garland on Pinterest the other day and I just loved the choice of lyrics. Whenever I look at it, instead of thinking of presents and carols and holiday treats, I think only of Christ's birth, which is appropriate. And it's pretty. So win-win. I grabbed some metallic red paper, fed it into my Silhouette Cameo, and hot glued it to some twine. My favorite part from the inspiration garland (link referenced above) is this trick to line up the letters nice and neat.


So here is my version. I bought these giant antlers at a flea market a couple of weeks ago and right away I knew they needed something lovely strung between them.


Christmas time... is the best time... of all the times. 
Also, I miss when The Office was good.

11.07.2012

Must-Dash


Just a little logo I did for a friend's racing team. Dash on, folks.

General Conference


So this is a late post because General Conference was over a month ago. But anyway, among the talks and guidance that was given, one comment really struck a chord with me. I should look up who said it, but one of the authorities talked about going to visit a poor family's home in... a country. Forgive me, I really need to look it up, it's been a while. When he entered the modest home, the only decoration he saw was a sign on the wall the read,  "My testimony is my greatest possession."

I was so moved by this because I was reminded how important the Gospel is to me... And how so much of what consumes my thoughts each day is not even important (and coincidentally, a lot of that has to do with materialistic possessions like those in the posts below). Right away I knew this was something I wanted to be reminded of each day (I wrote it on my little chalkboard and put it on the wall right by our front door as soon as the session was over) - because when it's all said and done, while everything I own and hold dear could be taken away from me, the one thing that will always be mine and only mine is my testimony.

My testimony.

I know that Jesus Christ is my Savior. I know that He is the reason I have a family that will be together forever. I know that He made the greatest, most loving and selfless sacrifice to give me that gift. I am so grateful to know that His church is on the earth today and that I am able to find so much joy in it. This knowledge is what makes life beautiful to me and everything I love and hold dear can be traced back to this truth... and my testimony of it.

I am so thankful for General Conference and the lessons I am taught as I listen to the words of inspired men and women.

Mid Century Dresser Makeover

Phew! Knocked out a couple of old project posts and now I can finally post the one I'm actually proud of!

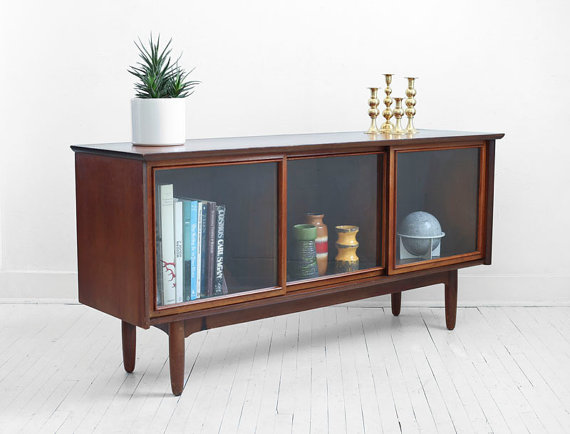
So this is the story of finding my beloved mid century dresser/credenza. I had been wanting one for agesss. But dang it, I could not find a cheap on on Craig's List so I contented myself with drooling over ones online and hoping that maybe someday I'd find one magically at Goodwill for super cheap.


Like these lovelies.

Well, my waiting finally paid of. The street behind our's has a bunch of apartments and one day while driving by I saw a whole pile of junk in front of one of them, out by the sidewalk. So naturally, I stopped to look because junk piles are my fav. And I saw this dirty, junky old dresser underneath a huge 200lb TV. But there was no "free" sign. And no indication that they weren't just in the process of moving.

So I got all creepy. I stalked this thing out... for like a week.

And finally after driving by twice a day for 4 days I saw a the owner and asked if he would sell it and he said he'd give it to me for $20! SCORE! So me and Chaser dollied this beast down the street to our house. To say Chase was as excited as I was would be the biggest lie in the history of the world, but hey, he let me buy it.

The before:


I realized a few things after we got it home. While the dresser is solid wood, the tops, sides, and drawers all had a thin veneer on them - still it was at least a real wood veneer. But I realized there were too many chunks on the top and sides to be able to stain those. Instead I ended up filling them with wood filler.

After giving the top, sides, and legs a light cleaning and sanding, I primed them with a coat of Zinsser oil based primer. I'm super glad I did, even though it was a little annoying to clean the brushes afterward. It just gave it a really good, strong base. I then painted two coats of regular latex white off-the-shelf paint. I used a foam roller for both the primer and first coat of paint, but then used a brush for the second coat or paint. I also used Floetrol which I am now a huge fan of! It is so perfect for our dry, warm weather because it slows down drying time and helps prevent brush strokes. It worked wonderfully!

For the drawers, I used Citristrip to carefully scrape off the stain of the veneer. I was so worried about going through it, so it took me a while to strip. Then I sanded the drawers lightly and cleaned out all the cracks (those middle drawers have grooves in them).

I mixed some stains we already had to get the color. It came out exactly how I wanted, which is a miracle because that never happens on my projects. I had a small can of English Chesnut and added maybe 5 or 6 tablespoons of Ebony to it. I applied the stain with a foam brush and left it on for 20 minutes before wiping it off with a clean rag. After the drawers had dried 24 hours, I put on two coats of poly to seal them. Note to self: spray poly is not a good idea and regular poly (at least for this project) does not need sanding in between coats.

To finish, I added two coats of clear Briwax to the painted surfaces and it's done! I really love how it turned out and how it looks in our little living room.


And the after:


I still can't believe how much I like this piece. Hooray for a project that actually turned out.

And we love our Karlstad sectional. We just bought it a couple of months ago and it's perfect for us. We even added new tapered legs, custom made by Uncle Bob's Workshop. They screw right into the old holes without having to install mounting plates.


And lastly, I need decorating help people. I bought this chair at the antique mall several months ago and I am agonizing over choosing a fabric to reupholster the cushions! I cannot seem to find something that jumps out at me as perfect. I'm not good at decorating. I'm much better at looking at other people's choices and getting inspiration. I just don't know what color or pattern to choose that is under or around $20-ish a yard. The few fabrics I have found that I really like end up with me saying "THIS IS THE ONEEE -- oh... $80 a yard..."

So... if anyone even reads this post (which really isn't likely) and has an idea (that would still match the rest of our living room as shown in the photos above)... please share! 


Chevron Stamped Curtains

I really loved these curtains from UO.


But they were expensive. So I took some old sheer Ikea curtains we had and tried to copy these. 

Okay... we can all agree UO's look way better. But for some short curtains in my office that no one really ever goes in but me, I'm happy to see these little guys behind my monitors every day. They were even kind of fun to make.

I ended up making a "stamp" using some super professional materials... like... a piece of styrofoam wrapped in an old rag and dipped in leftover paint. .


I'm seeing a trend in bad photos here. I'll work on that.

Mint Green Mid Century Desk

So my lovely friend Amanda graciously gave us her Craig's List mid century desk that she had planned on refinishing before her and her husband went away to law school. Since they couldn't bring it with them, they gave it to us! We have great friends. :)

Anyway, it was painted this horrible brown color. Yikes. I really, really wanted to stain this one too, but it was in too rough of shape that it wouldn't have been worth all the sanding and stripping. So I spent a couple of hours getting most of the thick, uneven layers of paint off (or at least smoothing it out) and painted it with a latex mint green paint (primer included). I really need to learn more about the world of enamel paint and maybe even try oil-based, but I just dread the cleanup. But in this case, it may have been worth it because this paint had a tough time hardening up. Eventually it did, except the drawer fronts, which have a rubber texture on them and will forever have a sticky feel I think.

I painted the original handles, the metal brace under the desk top, and the brass feet a bright white. Once it was finished we moved it into my office and added a glass top to protect the surface, knowing I'd be using it daily for work.

My mom says it's a little too bright but I like it. This was my fun piece that the hubs said I could paint any bright color I wanted as long as I hid it in my office. Keyword is hid.


I'm not so great at taking photos... or setting up shots without wires and boxes. :)

Ombre-ish Cedar Chest

So before we got any new living room furniture, we were in the market for a coffee table (our sweet Ikea one fell apart on us). My mom said we could have her old cedar chest that she had growing up. I was excited to find something that was kind of retro looking, but that also was sentimental like that so we decided maybe it would work for our little coffee table.

Well turns out it was too tall, so we ended up just using it in front of our TV to hide all the wires and components - and it stores some of Finn's toys.


This was after a little sanding. Wouldn't it have been pretty had it been stained?


I have to say... I wish I hadn't painted it. Or put glass knobs on it - because I'm really not a shabby chic person. I originally was planning on staining it but I thought painting would be easier? Boof. It wasn't. But oh well, I plan on using it as a toy chest in our next house's playroom. Not that we have a "next house" yet, but the point is it won't always be in our living room, looking all... painted and stuff. But it was my first ever painted furniture project so it was a good learning experience.

For example, I learned that a clear, water-based polycrylic - which everyone online says will dry crystal clear - will, in fact, not always dry crystal clear. But Krylon spray poly worked really well... after I sanded the top and painted two more coats to cover up the yellow polycrylic. 

11.06.2012

Halloween 2012

Happy Halloween! We had a pretty fun one this year. Finn went as Young Link! I made his costume (and actually had a blast making it - used a lot of tips found here) and he pulled off the rest - complete with an actual Link-style somersault in the middle of our ward carnival. 


Just charging his sword. Watch out.


Unfortunately we took these midday, so the lighting is pretty bad. But he's so cute, it makes up for it.


Hunting for fairies? 


We took some photos of our awesome friends (who pretty much have the best costumes of all time every year) and this was just a silly one of Finnster putting the boys in their place.


We were also in charge of a booth at our ward party, so I made a bowling game out of Dollar Tree bats (turned upside down and painted white) and a bouncy ball with a face painted on it.


We had a par-tay of sorts too. I documented it poorly, but it was fun and tasty!


I hurried and made a costume 20 minutes before everyone came over, but it worked because I knew what I was going to be - just ran out of time to make it. I was Ash from Fantastic Mr. Fox. But I forgot the cape! :(


Thank you Pinterest, for all of your spooky ideas.